 A step that is surely hated in malware analysis is the repetitive task of creating a virtual machine (VM) and provisioning it with the required programs to do the job. With that in mind, Malboxes was first launched in 2017 to automate this process and therefore to save a lot of time for the malware analysts. This blog post will introduce a newly released feature of this tool that allows to run desktop versions of Windows in the Amazon Elastic Compute Cloud (EC2).
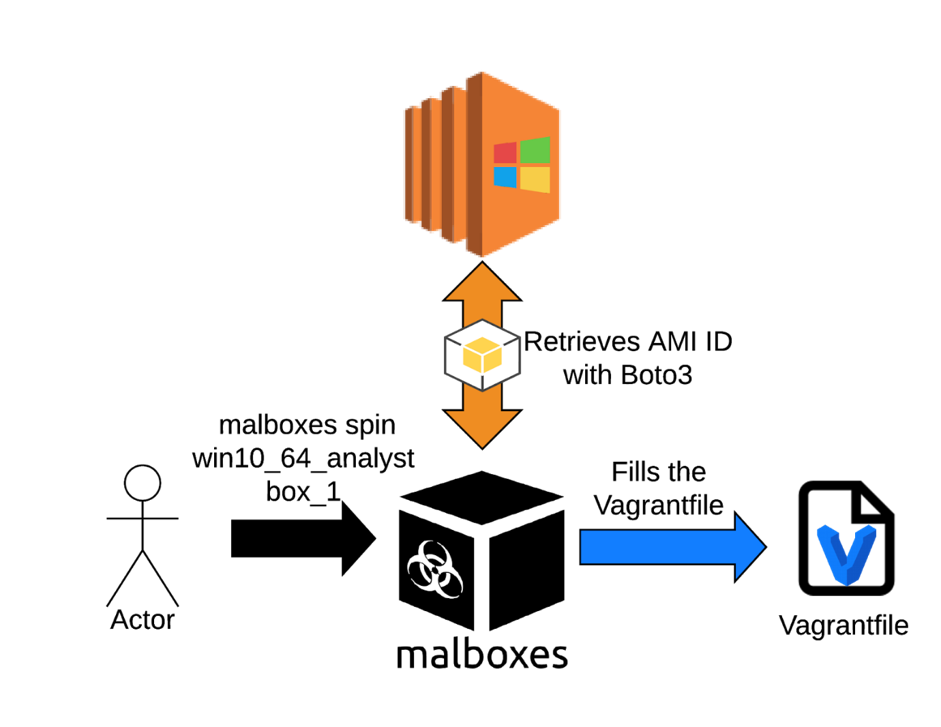
Malboxes mainly uses a combination of Packer and Vagrant to accomplish its work. It will first build and provision the VM with Packer then Vagrant will take the lead to manage and launch the instance. In fact, once the tool is installed and configured, deploying a Windows VM is a matter of only three commands.
With that said, Malboxes is indeed a great program to add to a reverse engineering’s arsenal, but there was still room for improvement.
The “Dirty Network” Problem
One issue that we met while testing Malboxes was the complexity of studying malware that interacts with the Internet. That comes from the fact that it is not always feasible to have a dedicated “dirty” network. We thought about modifying Malboxes to build a network of VMs as a solution, but it would require precise and automated handling of the firewall of the gateway to avoid LAN exposure and complex VirtualBox NIC changes which aren’t supported by Vagrant. This was considered too risky and time-consuming for the moment. Afterwards, we had the idea to upload and run our VMs in the cloud. This procedure greatly decreases the risk of malicious programs spreading on our side and allows us to test them while being connected to the Internet, therefore we had a solution.
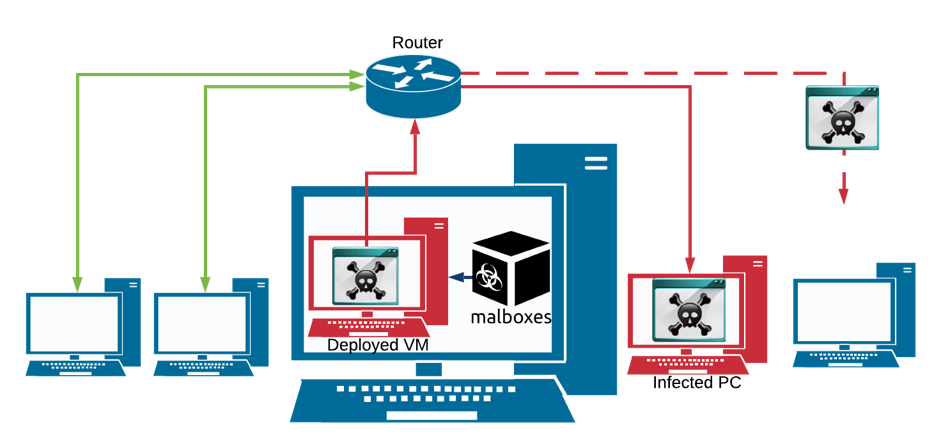
A Local Configuration
Notice the increased risk of workstation exposure. Malware with worm-like behavior or lateral movement modules could infected computers on the LAN.
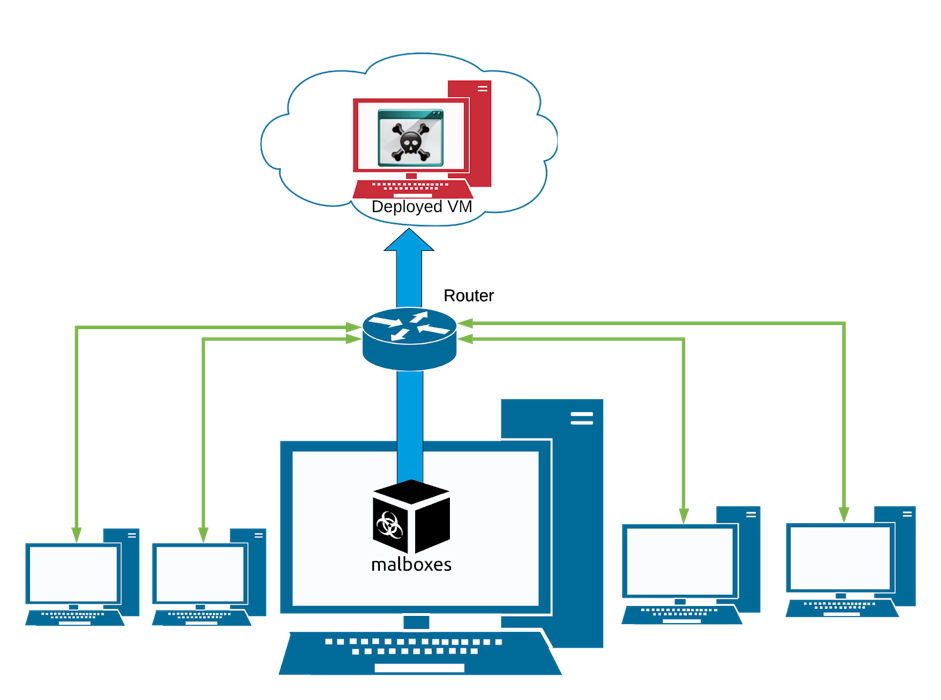
A Cloud Configuration
The soon-to-be-infected VM is deployed in an isolated Virtual Private Cloud (VPC). The local network is not at risk.
How does it work?
To integrate this feature in Malboxes, we chose to support the Amazon Elastic Compute Cloud (EC2) first. However, note that Packer and Vagrant both support other popular cloud services such as Azure, Google Compute Engine and Digital Ocean. Supporting other cloud providers should be relatively straightforward.
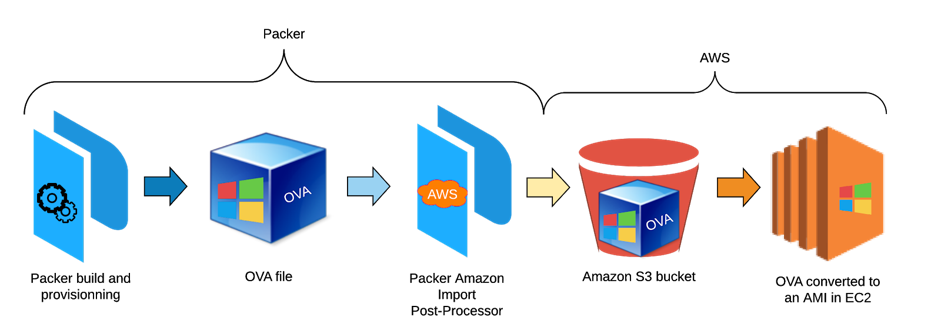
Building that feature, the first challenge we faced was to export the output of the packer build to an Amazon Machine Image (AMI), an image from which EC2 will launch the instance later on. It was possible to achieve this using the Packer Amazon Import post-processor and by modifying the output format to OVA (which stands for Open Virtual Appliance). The post-processor essentially uploads the OVA to an S3 bucket, Amazon’s cloud storage product, before converting it to an AMI.
Conversion process of an OVA to an AMI:
Amazon Import post-processor:
"post-processors": [
  {
    "type": "amazon-import",
    "access_key": "{{ aws_access_key }}",
    "secret_key": "{{ aws_secret_key }}",
    "region": "{{ aws_region }}",
    "s3_bucket_name": "{{ aws_s3_bucket }}",
    "license_type": "BYOL",
    "tags": {"Name" : "Malboxes", "Template": "{{ template_name }}"}
  }
]
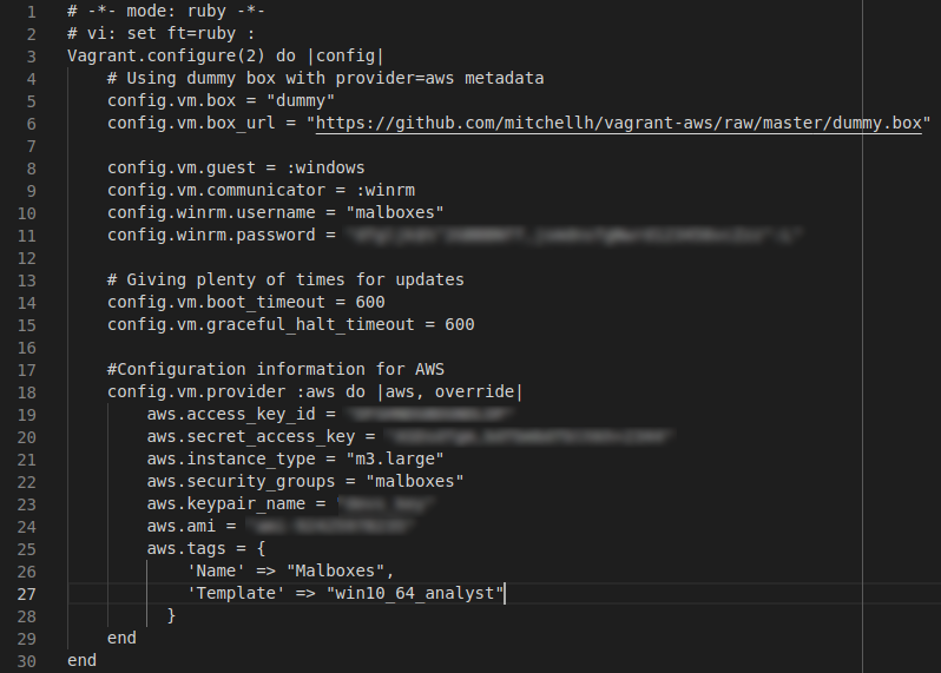
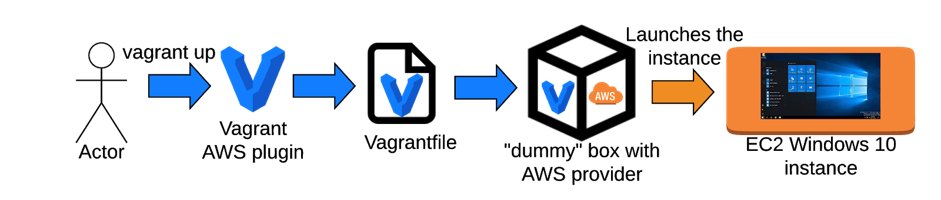
The next step was to interact and launch an EC2 instance from the AMI. Fortunately for us, Vagrant’s creator produced a plugin to do so: Vagrant AWS Provider. Through a box and a Vagrantfile, the extension allowed us to communicate with the EC2 a bit like the AWS command line interface. This solution is lightweight because the vagrant box is a “dummy” one and its only purpose is to define the provider, AWS in our case.
The last step was to manually fill up the Vagrantfile with the AWS information, such as the access key and secret access key. Then we were able to launch our first instance.
Vagrantfile example:
It turned out that configuring automatically the Vagrantfile was problematic due to the mandatory AMI ID field. This identifier was assigned to the AMI just after its import, so we had to pull the ID from the right AMI on EC2. After some research, we discovered the python library Boto3, which was designed to manage AWS. With that tool, the solution was in our hands. We identified each AMI with its template name, for instance, win10_64_analyst, and retrieved the AMI ID from a JSON file using that name.
Retrieving the AMI ID from AWS:
Launching an instance on EC2:
Finally, some security group configuration is required. Security groups are the way EC2 manages the inbound and outbound connections to an instance or a group of instances. To function properly, the security group assigned to the VM requires at least the port 5985 to be open for WinRM. On top of that, we added port 3389 to allow users to connect to the instance via RDP. When that was done, the feature was functional.
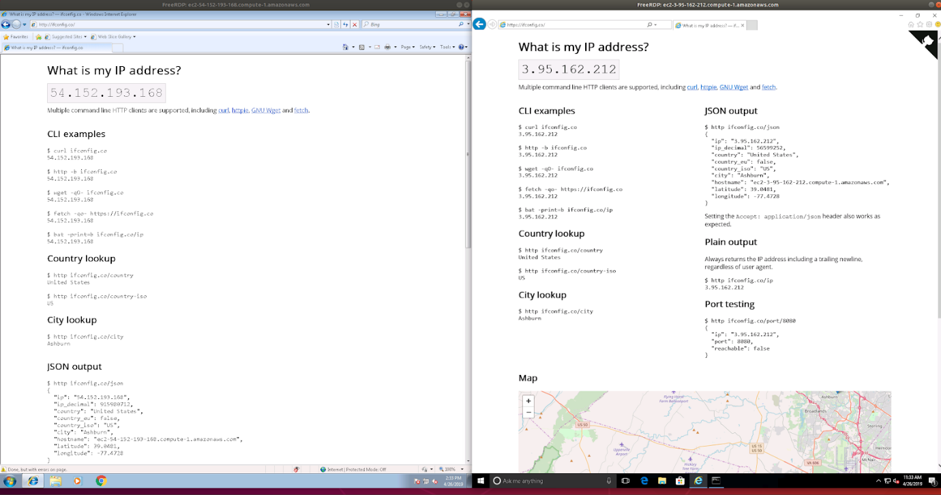
An instance of Windows 7 and 10 launched by Malboxes:
Limitations
It is important to note that the security groups are not handled automatically yet and it still must be done via the graphical user interface of EC2. According to our testing, the x64 version of Windows 10 and 7 runs without any problems. Windows 7 x86 works properly too. However, AWS did block the import of an OVA containing a Windows 10 x86 operating system.
Be careful, running malware in the cloud should be done with the same caution as you would have on your own PC. Even though you can do this with Malboxes, be sure that you have your cloud providers’ permission and that your newly created environment cannot access any other cloud resources that should not be accessible otherwise.
At this point, you have everything for malware analysis: an isolated setup in the cloud, with popular reverse-engineering tools installed and that you can easily connect to with RDP.
Here is a video that recaps the whole experience:
My experience analyzing a bitcoin miner
The best part of developing this feature was to finally be able to test it in a real situation by pursuing the analysis of a bitcoin miner named Debbie. This malware was first discovered using PyRDP by Emilio Gonzalez and Francis Labelle during their previous internship.
Malboxes, with the AWS feature, allowed us to push this investigation further by giving us the opportunity to test the network functionalities of Debbie. For instance, while monitoring the network traffic with Wireshark, we noticed an HTTP communication containing payloads formatted for the Stratum mining protocol. At first, the infected PC seems to log into the mining pool, then the pool responds with the job to accomplish and finally, the PC sends status messages about its work. This communication was one of the proofs that confirmed it was a bitcoin miner.

Analyzing the network communications of this malware would have been risky in a VM deployed inside our corporate network. With this feature developed in Malboxes we were able to do the investigation with network connectivity with little risk and destroy the VM after we were done. The interaction between Debbie and its mining pool is just one of the many ways this tool has made my life easier during this analysis.
Conclusion and the future of Malboxes
This blog post’s goal was to explain how the cloud deployment feature of Malboxes can be useful to any malware analyst from a beginner to an expert. Furthermore, it covered the export of a VM to EC2 and how to interact with it. In the future, this tool could certainly save time on a greater scale, for instance in a honeynet deployment.
This blog post was written by Etienne Lacroix as part of an internship with us. We are proud that Etienne managed to tackle a complex problem that required understanding of the Malboxes project, the AWS cloud and the trade of malware analysis. Good job Etienne! We are looking forward to what you will do next!